Food I've made that I want to remember to make again. Some people write their recipes down on index cards and store them in the kitchen. I write mine down in this blog and share them with you.

Sunday, February 19, 2012

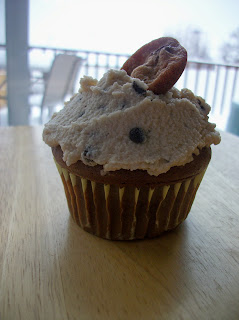
Cookie dough buttercream


So I made these cupcakes before, but the frosting needed some work.  I recently learned about this amazing product called Cookie Butter and instantly knew that it was the missing ingredient I needed to perfect this cupcake.  Cookie Butter is like peanut butter, only cookie flavored.  It's really hard to not sit down and eat it all with a spoon!


Cookie Butter is hard to find (Trader Joe's has it...when they can keep it in stock) so I used Biscoff Spread.  Same thing, different name.  You basically just add a spoonfull or two of Biscoff Spread to your regular buttercream recipe and then try not to eat it all before it goes onto the cupcakes.  I took the leftover frosting to Mom's house so she could top a cake off with it, but when I left she was eating it out of the bowl with a spoon.  It's that good!


3 sticks salted butter, room temperature
1/2 cup shortening
2 lb bag of powdered sugar (about 8 cups)
1/4 to 1/2 cup water
1/2 jar Biscoff Spread (maybe 3/4 cup?)

Use the paddle attachment for your mixer and beat the butter and shortening together together for a few minutes.  It should be super shiny and smooth!  Add the Biscoff Spread and beat it some more.  Slowly add in the powdered sugar giving it time to incorporate so you don't end up with a powdery white mess all over the kitchen.  As it gets thicker add the water as needed.  The more water you add the thinner it will be.  Once all the ingredients are in there turn the mixer to high and let it do it's thing for several minutes.  I went and did some laundry while it worked away.  I probably let mine go for about 8-10 minutes and the results were super smooth and fluffy. 


This would be good on a chocolate cake, but I stuck with my philosophy of "more is better" and put it top of my chocolate chip cookie dough stuffed cupcakes.  Is it really possible to have much cookie dough in a dessert?

Friday, December 23, 2011

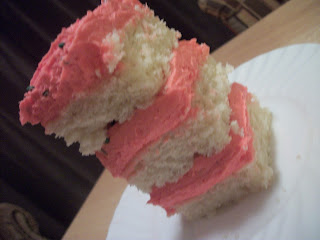
Sugar Cookie Bars


One of my favorite food blogs is Cookies&Cups. This girl knows what she's doing when it comes to sweet treats. She does crazy things like put Reeses inside Oreo's. That's the stuff dreams are made of and she actually does it! Yeah, she is super cool like that. If it's possible to absorb calories through the computer, this would be the site where it would happen. Thankfully she is also funny so I am able to burn some of those unwanted calories back off while I am laughing at with her. It's a good thing we are not neighbors or else I would spend all my free time finding excuses to stop by her kitchen and see what's going on in her mixer that day. 

When I decided it was time to try a new dessert recipe there was no question where to start (and finish) my online search. This recipe is completely copied from her so if you love it and want to try it please be sure to give her the credit she is due. I am only posting it here in case Pinterest dies a sad death one day and I lose all those amazing pins I have saved. I don't want to forget this one and so it goes here in my food blog of recipes I want to make over and over again.

Find her original Lofthouse Sugar Cookie Bar recipe here.


1 1/2 cups sugar
1 cup butter at room temperature
8 oz cream cheese at room temperature
1 egg
2 tsp vanilla
2 1/2 cups flour
1/2 tsp baking soda
1 tsp baking powder


Cream the butter, cream cheese, and sugar together. Add in the vanilla and egg and mix a little more. Switch the mixer over to low speed and add all the dry ingredients. This batter will be crazy thick and sticky and it will take all the self control you have to not get a spoon and sit down in front of the tv with just the mixer bowl full of batter. Be smarter than me and make this when you are home alone that way you can lick the bowl clean by yourself and not have to share it with your husband.
 
 
She recommends lining a cookie sheet with foil first and then spraying it with cooking spray. She's the expert, so I suggest you listen to her. Good luck spreading it around evenly...I told you it's thick and sticky. I end up using my fingers because the spatula just wasn't cutting it. Once you get done licking your fingers pop that sticky mess into a 350 oven for 20 minutes, or until the edges start to turn light golden brown. I've made this twice (in one week...but it's Christmas so I have an excuse) and it takes a little longer than the recommended 20 minutes in my oven. Keep an eye on it and pull it out when it just starts to turn brown. 


Let it cool and then frost with a thick layer of buttercream. Yep, this is her recipe too and it goes very well with the cookie bars. They are like a match made in heaven and I am not one to break up a good match.


1 1/2 cups butter at room temperature
1/2 cup shortening
2 lb bag of powdered sugar (7-8 cups)
1/4 to 1/2 cup milk
splash of vanilla (optional)
(I also added a little almond extract because everything's better with almond extract)


Cream the butter and shortening for about 3 minutes. Turn the speed way down and add the powdered sugar and milk. I start with 1/4 cup milk and then add increase the amount by 1 tbl at a time until it gets to the right consistency. I like it pretty thick for these bars.

Gloop it on nice and thick! These bars are good with a thick, super thick layer of frosting. You're not going to need it all though so have a back up plan for the extra frosting. It's a shame to let good frosting go to waste.


This makes about 40 heavenly squares. You can't taste the cream cheese, but it's there, working it's magic creating soft, moist cookie bars. Trust me, these are worth making!

Thursday, February 3, 2011

Chocolate Chip Cookie Dough Cupcakes


When 3 Girls Cupcakes announced that they were going to have a party to celebrate 1 year of business they asked for their biggest fans to bring some cupcakes of their own to honor 3GC.  I didn't have a great cupcake recipe, or a cupcake recipe at all.  My cupcake baking skills were limited to box mixes and various attempts at frosting.  So I started researching recipes, which got me no where but frustrated.  I didn't have the time or money to try several recipes until I found one that was amazingly delicious and easy.  I was not interested in making cupcakes with something crazy like bacon, or even flaming strawberries, although they may look amazing.  Then I came across chocolate chip cookie dough cupcakes and my eyes lit up.  Cupcakes and cookies all in one - Score!  I read a lot of recipes and took the best parts of each one to create my own version.

These cupcakes have a chunk of cookie dough baked into the middle of the cupcake.  I made my cookie dough from scratch using this recipe; however you can also use that refrigerated dough that you just break apart and bake.  I used that on my first batch and it worked great, but I wanted it be a little more homemade for the 3GC birthday party, so homemade dough it was for me! 


Roll the dough into balls.  It's much easier if you dip your hands in flour every once in a while.  I made my balls around 1" wide (maybe a little bigger).  Of course if you decide to go with the refrigerated break apart cookie dough you will be able to skip this step.  Freeze the dough balls overnight.  It is very important that they be frozen.  If they are not frozen the dough will bake into the cupcake and you will have a cookie inside a cake, which is not bad, but not what we are going for here.  Bake mini (tiny) cookies with the remaining dough.  These will be used to top the cupcakes after they are frosted. 

For the actual cake I just used a devil food cake mix.  I attempted to make cupcakes from scratch, but they didn't turn out so well.  Nothing wrong with a boxed cake mix since I am not a professional baker :)


Fill the cupcake liners about 2/3 of the way full.  You can put a little less batter in them than normal since you are going to add dough to them as well.  Set a frozen cookie dough ball on each cup of batter, it will sink as it bakes.  Bake for 16-18 minutes at 350.  The larger your cookie dough balls are the longer it will need to bake.  The cupcakes will still be a little doughy at the top center and that is ok.  The cookie in the middle causes that little spot on top to not want to cook all the way.  I just scoop it out and fill it with frosting after they cool.  The cake will dry out and the cookie will overbake if you leave them in the oven until the top center is done. 


See how they still look a little "soft" on top? 

Cookie Dough Buttercream Frosting
2 sticks softened butter
2/3 cup brown sugar
1 2/3 cup powdered sugar
1 tsp salt
1 tsp vanilla
1 tbsp milk
1 tsp dream whip
mini chocolate chips

I get the butter out of the fridge,  put it in a bowl, and set it on top of the warm stove while I bake the cupcakes so it will get soft.  Put the butter into the mixer and beat it on high speed for several minutes.  I turn it on and go do something else for about 3-5 minutes.  The butter should look and feel silky.

Add the vanilla, salt, and dream whip; beat some more.  Add the brown sugar first, a little at a time making sure it gets mixed in really well before adding more.  Add the milk.  Follow with the powdered sugar, adding a little bit at a time and working up to a high speed again.  If it is too sweet you may need to add a pinch more salt to balance it out. Stir in the chocolate chips.  I use about 1/3 of a bag. 

Make sure the cupcakes are cooled before frosting.  Scoop out the uncooked portion of the cake if necessary and fill it with frosting.  Top with a mini chocolate chip cookie. 


Chocolate Chip Cookies


**Better picture coming soon**

I have tried many different chocolate chip cookie recipes over the years, but my favorite is the one you find on the back of the Nestle Toll House chocolate chip bag.  Mrs. Fields and Nieman Marcus have nothing on Nestle Toll House! 

1 cup (2 sticks) butter - softened
2 large eggs
3/4 cup sugar
3/4 cup brown sugar
1 tsp vanilla extract
1 tsp salt
1 tsp baking soda
2 1/4 cups flour
1/2 bag of mini chocolate chips

Mix everything together and bake @375 for 9-11 minutes.  If your a little on the crazy side (like I sometimes am) you can roll each spoonful of dough between your hands to form a perfect ball.  This will ensure that all cookies come out in perfect circles.  Yep, sometimes I'm a loser and I try to make my cookies look perfect (for the 10 seconds they last before they get eaten). 

Recipe says this makes 60 cookies...but I've never gotten 60 cookies out of it!  I make my cookies larger than recommended and I might eat a little bit of the dough....

Since there are just two of us I usually mix the dough up on Sunday and put it in the refrigerator that way I can pull it out after dinner during the week and make one pan of cookies for dessert...night after night. 

Saturday, January 29, 2011

BBQ Chicken in Cornbread Cups


These are much better than the picture makes me them look.  Trust me!

This morning on the Food Network every episode was about superbowl food.  These cornbread cups filled with BBQ chicken is from Paula Deen (see her recipe here).  I didn't follow her recipe exactly, but took what I remembered from the show and made them from that. 
  • 1 box Jiffy Cornbread Mix (and the stuff to make it)
  • 1-2 chicken breasts
  • BBQ sauce
  • Sweet Pickles
Mix the cornbread according to the directions on the box and bake in a mini cupcake pan.  I made my first pan without cupcake liners, but it was very difficult to get them out, so I strongly suggest the cupcake liners.  I baked mine at 400 degrees for 12 minutes and they were perfect. 

 Once they come out you will need to smash the centers in so that a cornbread cup is created.  It's easier to smash them in while they are warm.  Be sure to only smash the centers, not the edges so that you will have a cup to hold the chicken in.  The cupcake liners really help keep everything together at this point. 

I used chicken breast I had in the freezer, but on the show they used a rotisserie chicken, or you could also used canned chicken.  Chop it up into tiny pieces and mix in some bbq sauce to taste.  Spoon the chicken into the cornbread cups and top with sweet pickles. 

I ate one warm and one cold...good both ways, although I recommend eating them warm.  This recipe was so easy and quick.  I was able to cook the chicken, mix it with bbq sauce, and cut up the pickles all while the mini cornbreads were baking.  I think next time I'll try mixing some cheese into the cornbread before baking it, because cheese makes everything better!

Sunday, January 23, 2011

Tomato Cheese Garlic Toast

Asiago Cheese Loaf

Troy and I love this asiago cheese bread from Walmart.  We splurge every once in a while and get a loaf of it when we go to the "big" Walmart that is a little further away from home.  We like it as garlic toast with butter, garlic salt, and some parmasean cheese.  It also makes a super indulgent grilled cheese sandwich with a slice of pepperjack in the middle. 

I am always looking for new ways to use this bread and as I looked around the kitchen today I came up with the following delicious lunch.


The bread is topped with a little bit of garlic butter, a slice of provolone cheese, sliced tomato, and brushed with a bit of olive oil to help the cheese get nice and crispy.  I put it under the broiler until the cheese started to bubble and turn brown.  I really had no idea what to expect, and had very little hope that Troy would like it (there's no meat!), but boy oh boy was it good!  Troy couldn't stop raving about how great it was and that is saying something because he probably would never have eaten that if I had presented another option. 


In fact it was so good that we ate it all before I got a chance to take a picture of the finished product.  I sprinkled a little parmesan cheese over the top of mine because it reminded me of mini pizza's and well, I just really like parmesan cheese. We will definitly be making this one again!

Thursday, January 20, 2011

Homemade Ice Cream


4 eggs
1 1/2 cups sugar
4 tsp vanilla
1 tsp salt
1 1/2 pints whipping cream
1 pkg instant pudding (flavor of your choice)

Milk

Mix all ingredients (except milk) together and pour into your ice cream freezer.  Pour in milk until the liquid reaches the "fill" line.  Make the ice cream according the directions on your freezer.  We use a 4 quart ice cream freezer. 

We like to use white chocolate or cheesecake pudding mix in our ice cream.  The pudding gives it a creamier flavor and is (in my opinion) the most important ingredient. 

This ice cream is best when it's served right away.  I love it soft and creamy before it's had time to set up all the way.  These pictures are of what the ice cream looks like after it's been in the freezer for a couple days and is now "hard serve" ice cream (that softens up quickly). 


Here it is on top of a warm chocolate chip cookie bar and topped with chocolate syrup.